手搓 Gitbook 主题
- 2022-09-13
- 2022-09-18
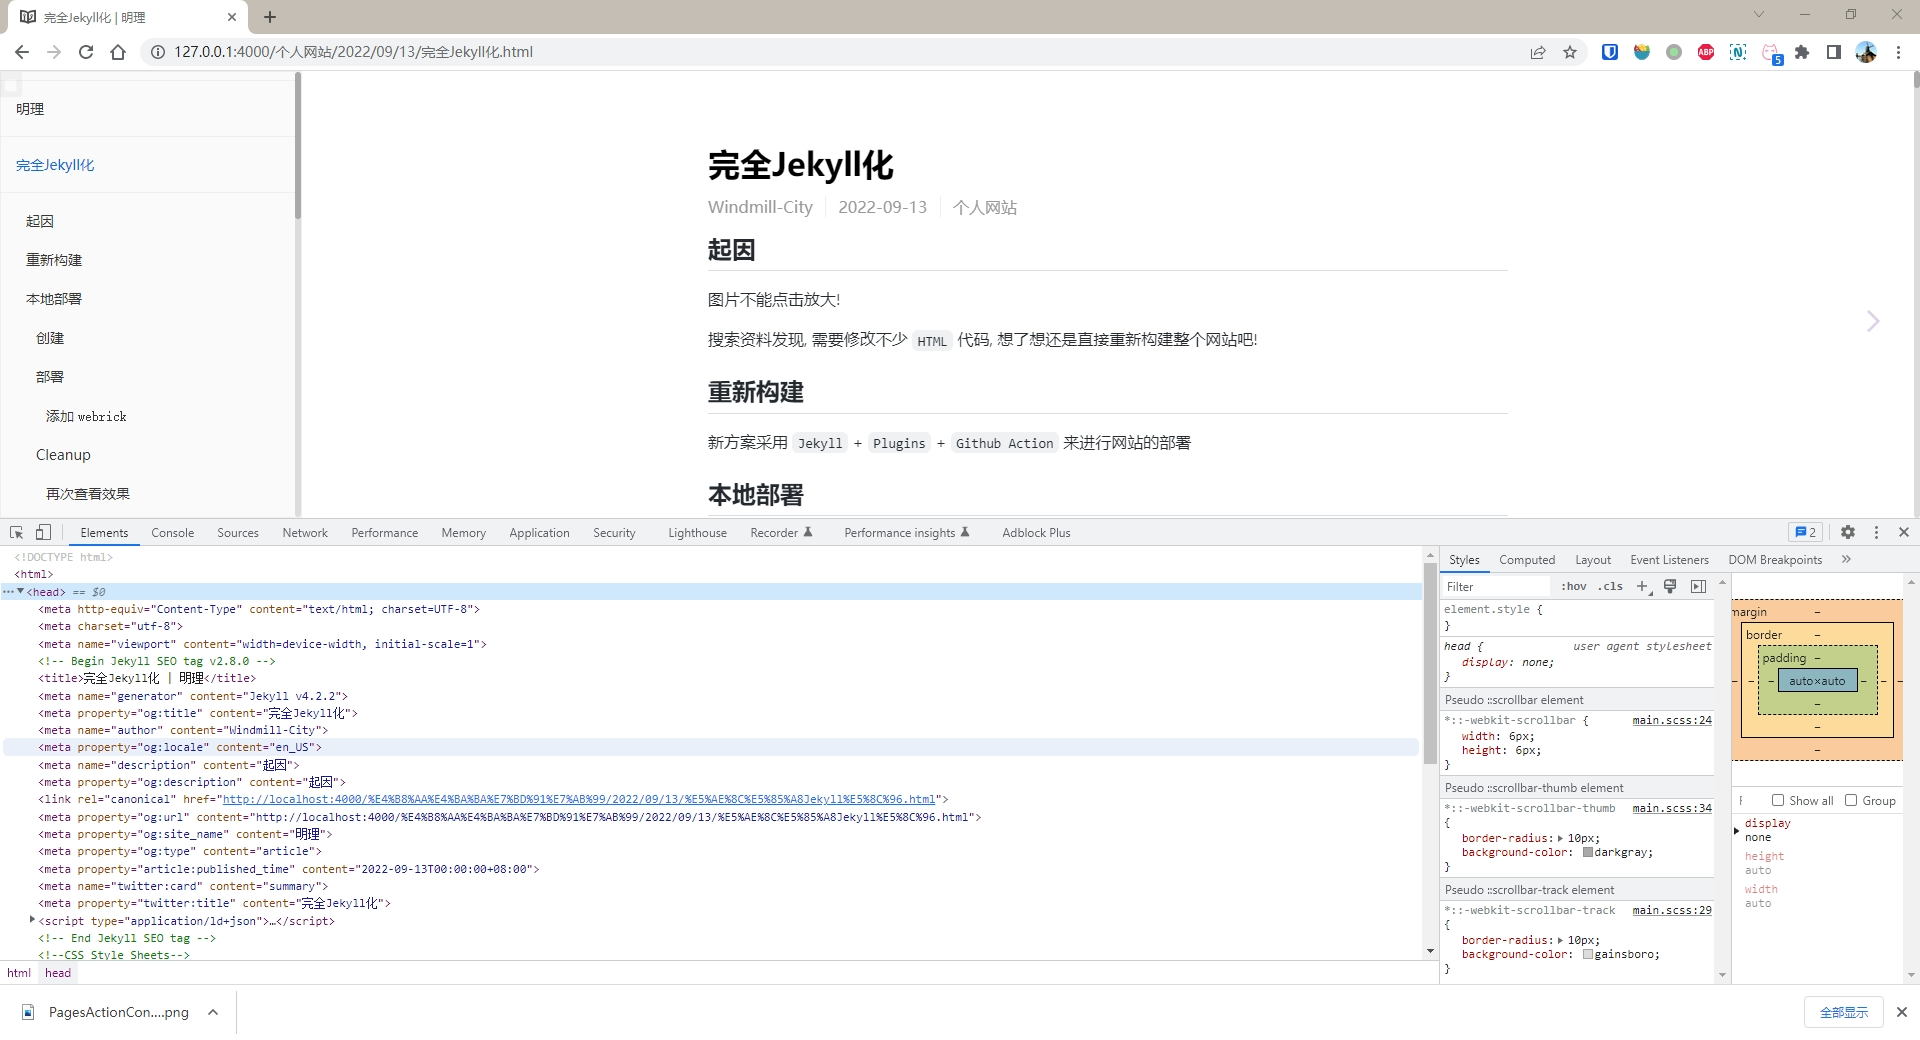
起因
图片不能点击放大!
搜索资料发现, 需要修改不少 HTML 代码, 之前的 Gitbook 主题又太冗杂了, 想了想还是直接重写整个网站吧!
重新构建
新方案采用 Jekyll + Github Action 来进行网站的部署
本地部署
Jekyll 的安装过程见上一篇文章在本地测试个人网站
创建
jekyll new blog
---
New jekyll site installed in E:/Codes/blog
部署
jekyll serve
---
jekyll-4.2.2/lib/jekyll/commands/serve/servlet.rb:3:in `require': cannot load such file -- webrick (LoadError)
emm…? 搜索了一下, 原来 Ruby 在 3.0 以后不再附带 webrick 了
添加 webrick
bundle add webrick
jekyll serve
---
Server address: http://127.0.0.1:4000/
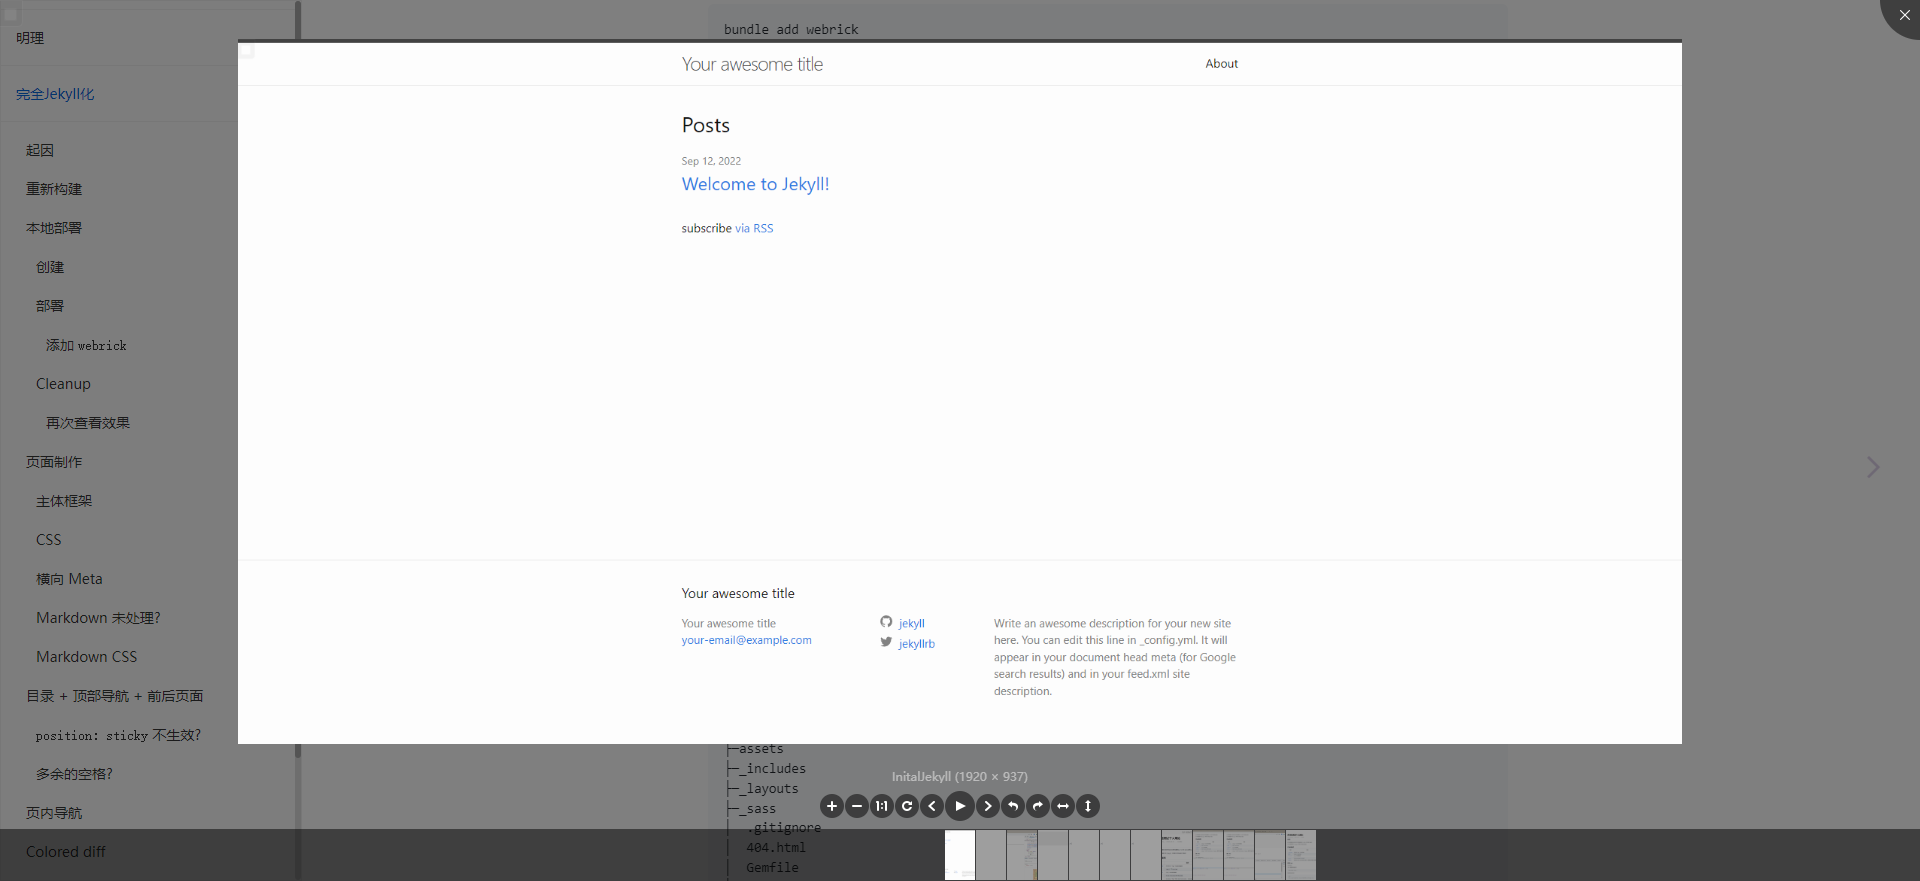
这下正常了, 访问 http://127.0.0.1:4000/ 查看页面效果
Cleanup
tree \f
---
blog
├─assets
├─_includes
├─_layouts
├─_sass
│  .gitignore
│  404.html
│  Gemfile
│  Gemfile.lock
│  Index.md
│  _config.yml
清理无用的文件
_config.yml
# Site settings
title: 明理
author: Windmill-City
email: 1449182174@qq.com
description: >-
  简单的规则构造出复杂的系统
baseurl: ""
url: "https://windmill-city.github.io/"
Index.md
---
layout: home
title: 主页
permalink: /
---

>{{ site.description }}
Gemfile
source "https://rubygems.org"
gem "jekyll", "~> 4.2.2"
group :jekyll_plugins do
end

# Windows and JRuby does not include zoneinfo files, so bundle the tzinfo-data gem
# and associated library.
platforms :mingw, :x64_mingw, :mswin, :jruby do
  gem "tzinfo", "~> 1.2"
  gem "tzinfo-data"
end

# Performance-booster for watching directories on Windows
gem "wdm", "~> 0.1.1", :platforms => [:mingw, :x64_mingw, :mswin]

# Lock `http_parser.rb` gem to `v0.6.x` on JRuby builds since newer versions of the gem
# do not have a Java counterpart.
gem "http_parser.rb", "~> 0.6.0", :platforms => [:jruby]

# Webserver library
gem "webrick", "~> 1.7"
再次查看效果
jekyll serve
---
Server address: http://127.0.0.1:4000/

正确显示啦!接下来就是以此为基线进行 Gitbook 页面的制作了
页面制作
| 页面构成 | |
|---|---|
| 侧栏 | 文章 |
| 搜索 | 标题 |
| 目录 | Metadata |
| 页面导航 | 内容 |
主体框架
先进行 文章 部分的制作
home.html
<!DOCTYPE html>
<html>

<head>
    <title>{{ page.title }}·{{ site.title }}</title>
</head>

<body>
    <div class="page">
        <!--Title-->
        <h1>{{ page. title }}</h1>
        <!--Metadata-->
        <header class="meta">
            <ul>
                <!--Author-->
                <li class="author">
                    {{ page.author | default: site.author }}
                </li>
                <!--Date-->
                {% if page.date %}
                <li class="date">
                    {{ page.date | date: "%Y-%m-%d" }}
                </li>
                {% endif %}
                <!--Categories-->
                <ul class="categories">
                    {% for category in page.categories %}
                    <li>
                        {{ category }}
                    </li>
                    {% endfor %}
                </ul>
            </ul>
        </header>
        <!--Markdown Content-->
        <section class="content">
            {{ page.content }}
        </section>
    </div>
</body>

</html>
嗯! 页面的主体结构出来了, 接下来为它附加 CSS 效果
CSS
--- a/_layouts/home.html
+++ b/_layouts/home.html
@@ -3,6 +3,8 @@

 <head>
     <title>手搓 Gitbook 主题·明理</title>
+    <!--CSS Style Sheets-->
+    <link rel="stylesheet" href="/assets/css/styles.css" />
 </head>
styles.sass
+++ b/assets/css/styles.sass
@@ -0,0 +1,3 @@
+---
+---
+@import page
styles.sass 作为所有 scss 文件的集合
由于 Front Matter 的存在, 使用 scss 在格式化时会出问题, 这里使用 sass
page.scss
+++ b/_sass/page.scss
@@ -0,0 +1,3 @@
+.page {
+    background-color: #eee;
+}
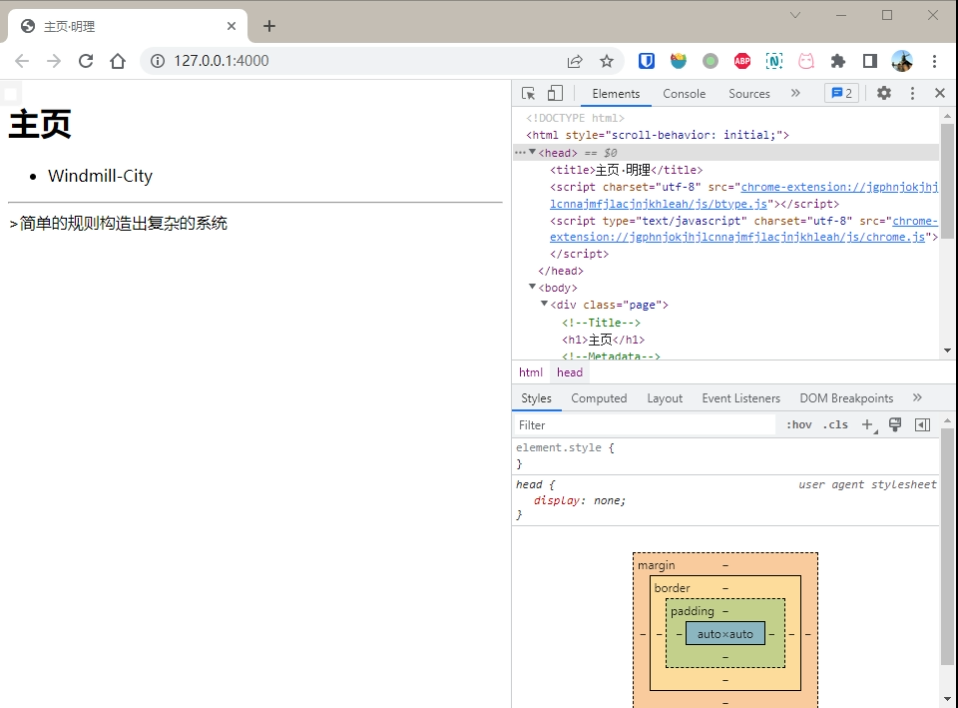
这里先修改一下背景颜色作为测试
--- a/Index.md
+++ b/Index.md
@@ -1,6 +1,8 @@
 ---
 layout: home
 title: 主页
+date: 2022-9-13
+categories: cate1 cate2
 permalink: /
 ---
为了方便调试, 添加了 Metadata 条目
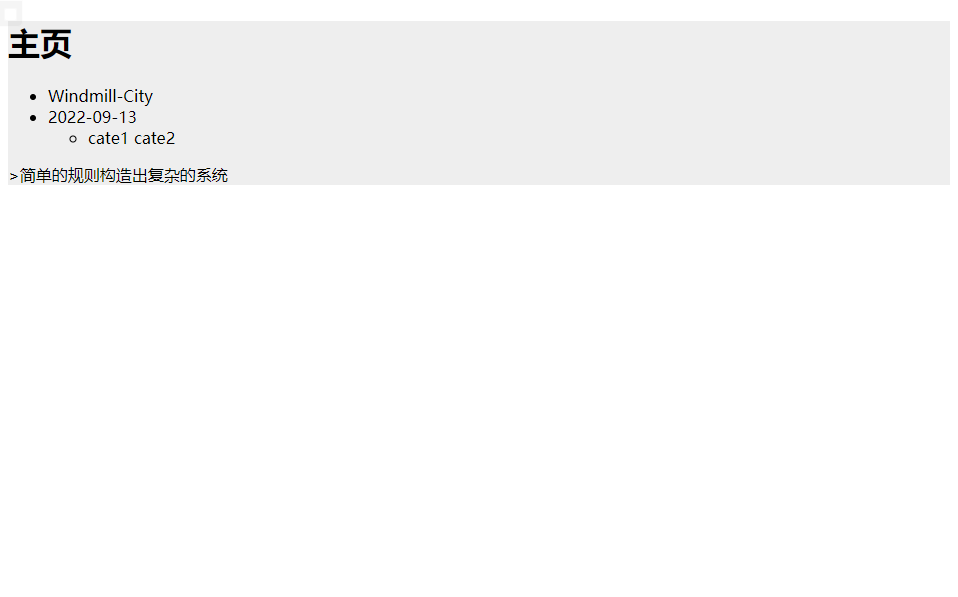
背景颜色发生了改变, 验证了 scss 文件的有效性
横向 Meta
接下来让 Metadata 横向排布
+++ b/_sass/page.scss
@@ -0,0 +1,25 @@
+.page {
+    .meta {
+        ul {
+            margin-top: -0.6em;
+            padding: 0;
+            color: #999;
+
+            li {
+                display: inline-block;
+                margin-right: 8px;
+                padding-left: 12px;
+                border-left: 1px solid #EEE;
+            }
+
+            .author {
+                padding-left: 0;
+                border: none;
+            }
+
+            .categories {
+                display: inline-block;
+            }
+        }
+    }
+}

效果不错, 达到了预期目标
Markdown 未处理?
emm..? 怎么 Markdown 好像没有被处理?
搜索发现, 使用 page.content 仅仅将 Markdown Raw 引入, 要引入处理后的应当使用 content
--- a/_layouts/home.html
+++ b/_layouts/home.html
@@ -36,7 +36,7 @@
         </header>
         <!--Markdown Content-->
         <section class="content">
-            {{ page.content }}
+            {{ content }}
         </section>
     </div>
 </body>

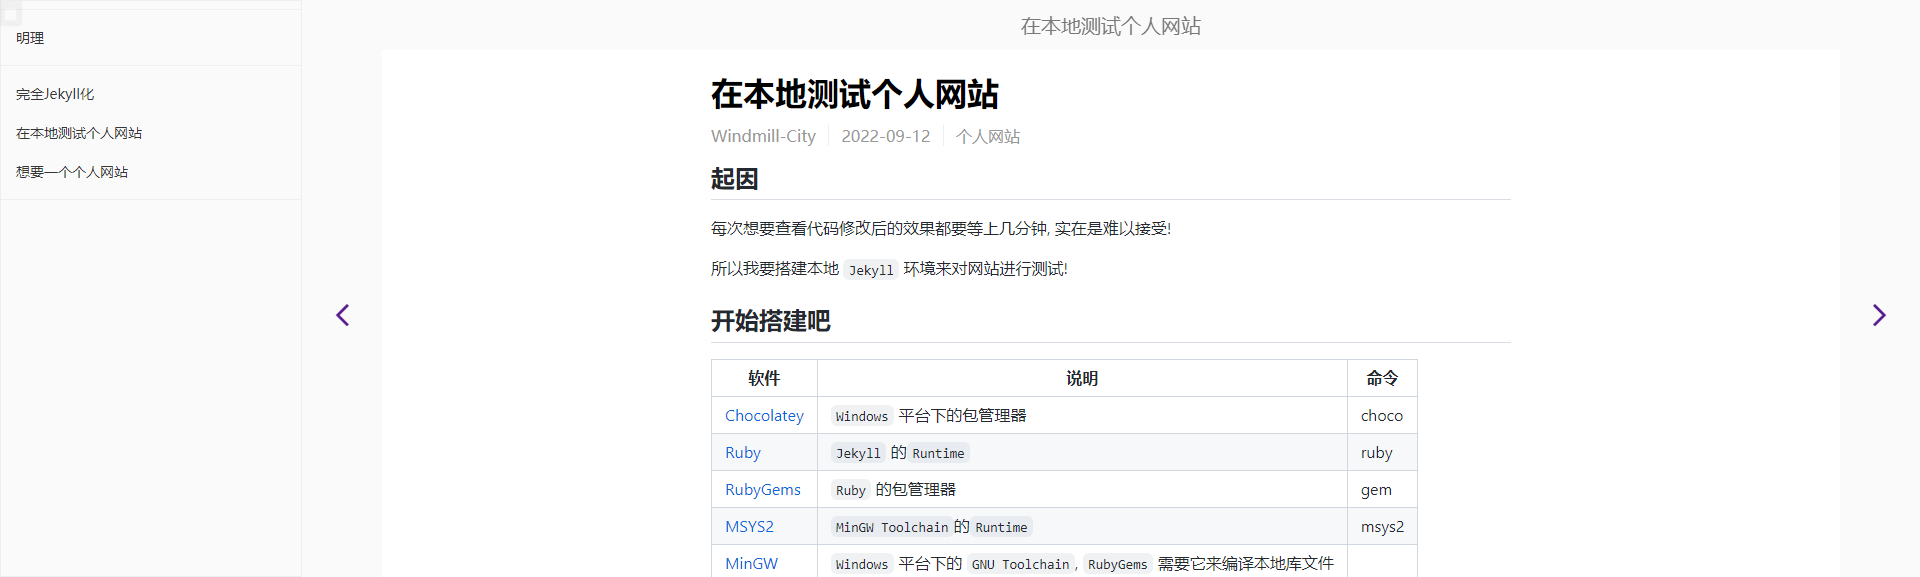
可以看到已经是处理后的 Markdown 了
Markdown CSS
现在为 Markdown Content 附加样式表吧!
不需要自己造轮子, github-markdown-css 这个项目直接从 Github 的 CSS 里面提取了 Markdown 相关部分, 直接偷就好了
git clone git@github.com:sindresorhus/github-markdown-css.git
assets->css<-github-markdown.css
--- a/_layouts/home.html
+++ b/_layouts/home.html
@@ -5,6 +5,7 @@
     <title>{{ page.title }}·{{ site.title }}</title>
     <!--CSS Style Sheets-->
     <link rel="stylesheet" href="/assets/css/styles.css" />
+    <link rel="stylesheet" href="/assets/css/github-markdown.css" />
 </head>

 <body>
@@ -35,7 +36,7 @@
             </ul>
         </header>
         <!--Markdown Content-->
-        <section class="content">
+        <section class="markdown-body">
             {{ content }}
         </section>
     </div>
注意: Markdown 内容的类名要为 markdown-body

CSS 应用成功!
目录 + 顶部导航 + 前后页面
将 home.html 拆分为多个文件, 放到 _includes 中
<!DOCTYPE html>
<html>

{% include head.html %}

<body>
    {% include nav-aside.html %}
    {% include nav-main.html %}
</body>

</html>
Ref: CSS Flexible Box Layout Module Level 1
整体采用 Flexbox 进行布局
主要难点是把 侧栏 \ 顶部导航栏 \ 页面箭头 给固定住
Flexbox 在 父元素 脱离文档流时表现通常不符合预期, 具体算法见 Line Length Determination
这意味着使用 position: fix | absolute; 将元素固定的方法是行不通的
所以应该使用 position: sticky 配合 top | bottom | left |right 来进行元素的固定
position: sticky 不生效?
Flexbox: align-items 的默认属性是 stretch, 这会导致元素在纵轴上拉伸
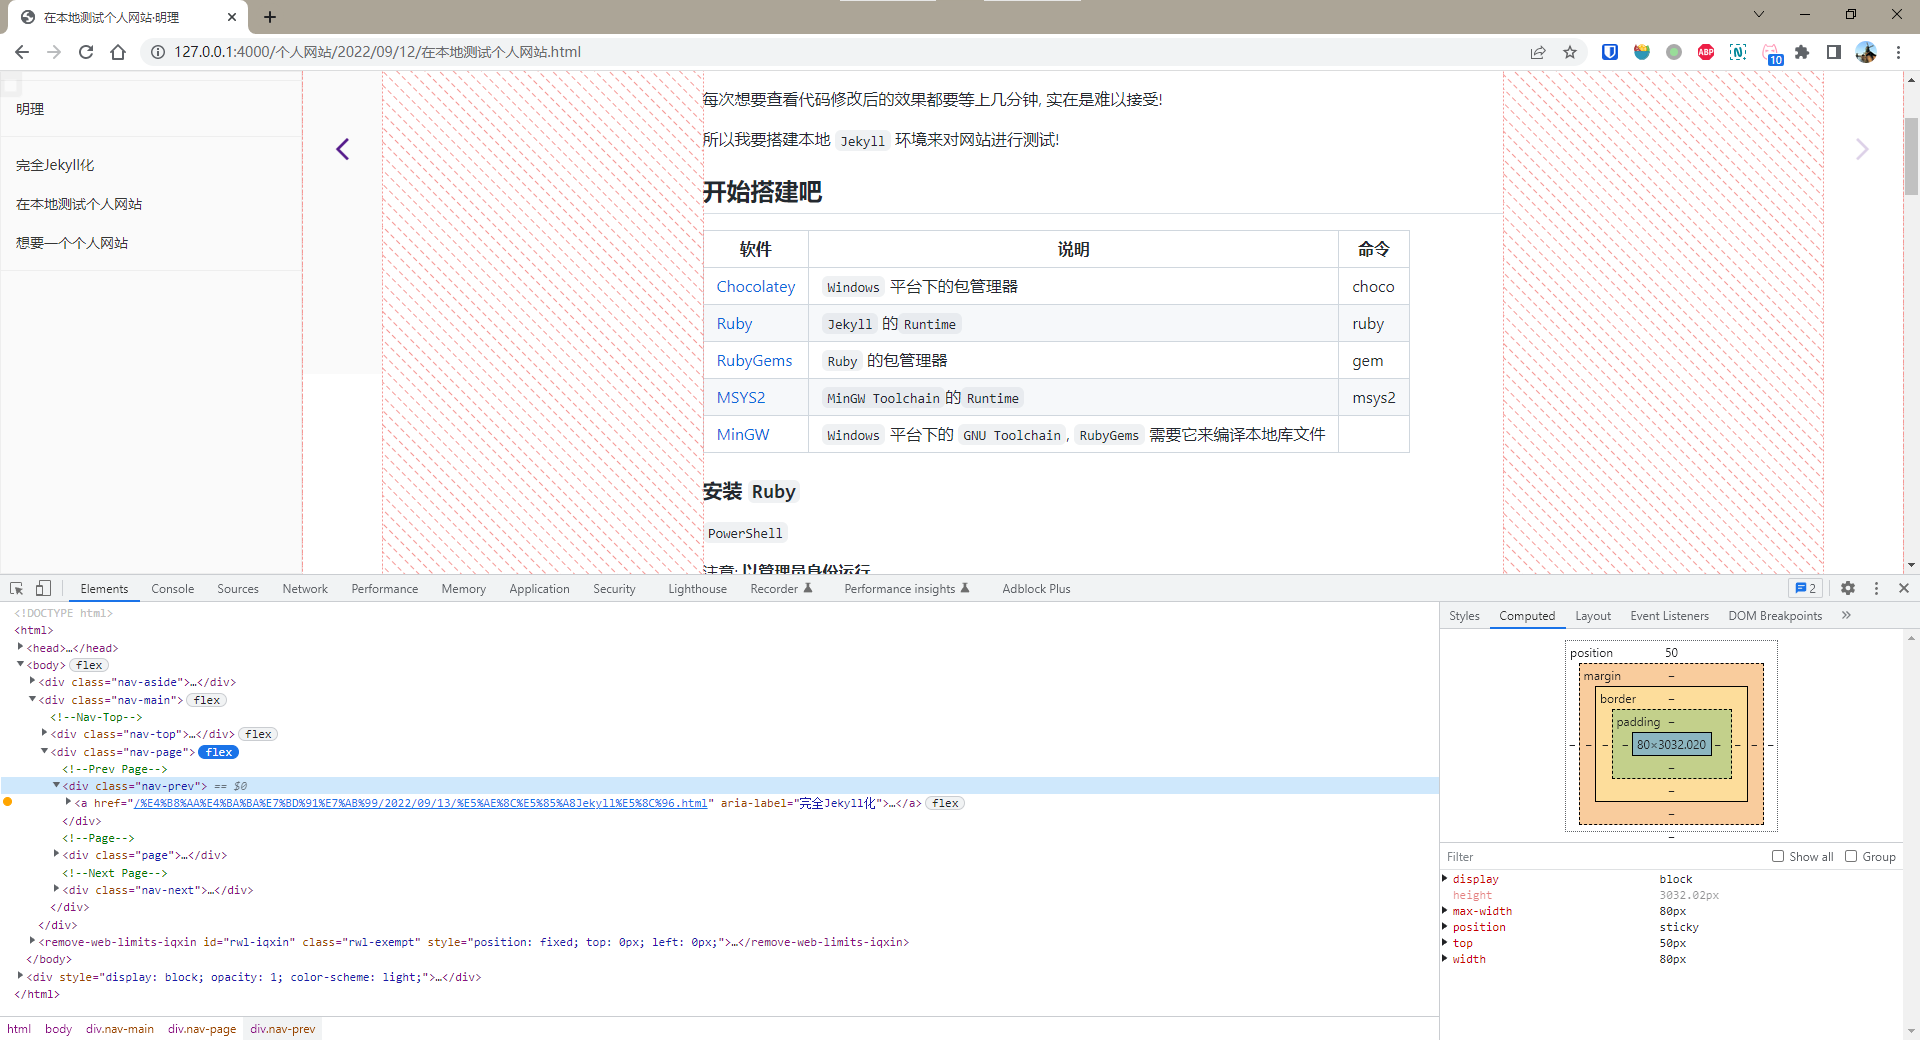
箭头下方的空白是拉伸的结果, 观察到, 调试工具 Computed 中的 height = 3032.02px
这意味着这个元素是一直延伸到 DOM 底部的, 进而产生 position: sticky 不生效的假象
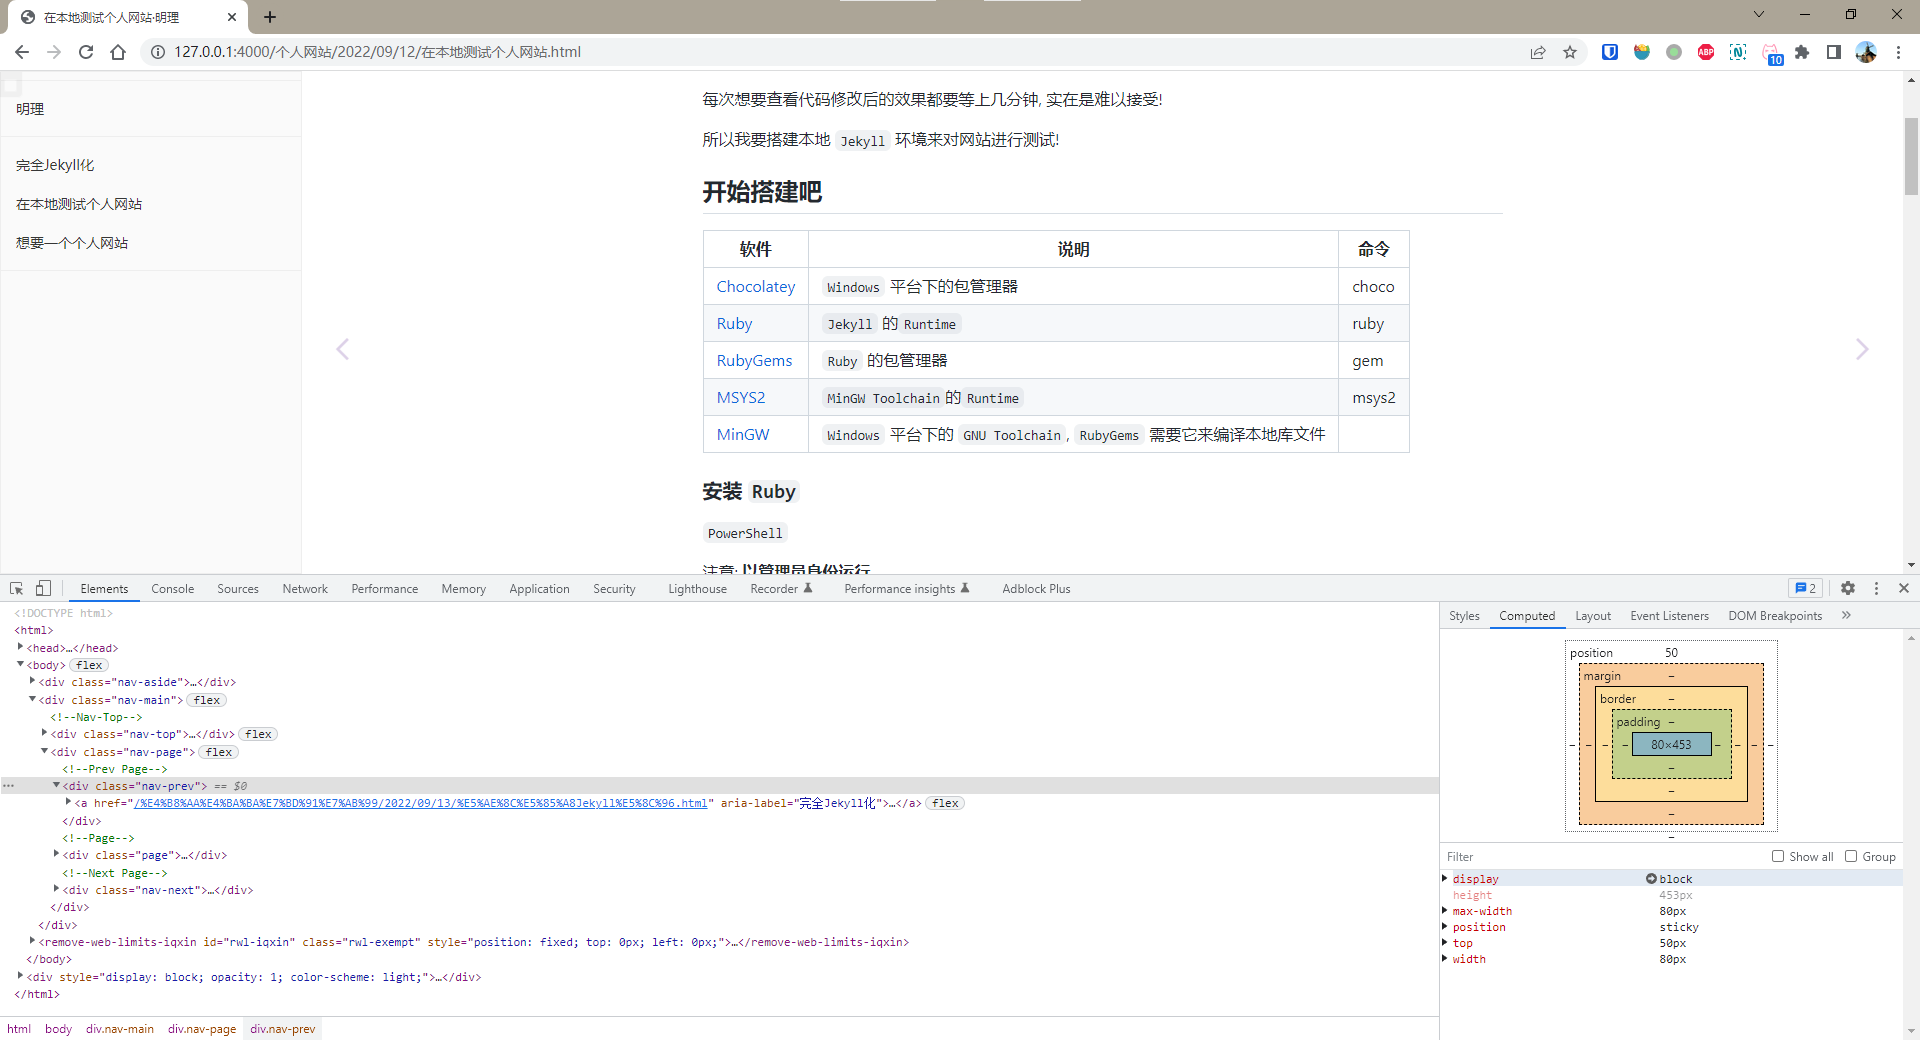
为 Flexbox 设置 align-items=flex-start, 这时 Computed 中的 height = 453px
显然这才是正确的元素高度, 这时 position: sticky 也产生了固定元素的效果了
多余的空格?
Pages 目录的生成过程中会产生额外的 空格, 导致 CSS 的 :empty 伪类不生效
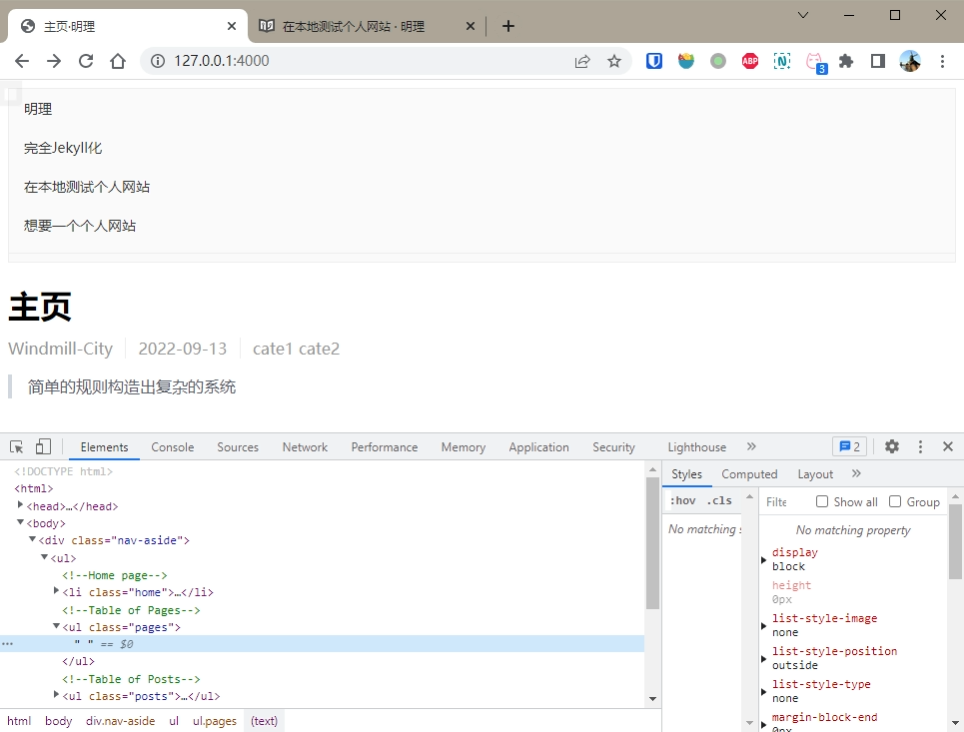
在 {%..%} 前后添加空格清除标记 - 就可以了!
--- a/_layouts/home.html
+++ b/_layouts/home.html
@@ -15,13 +15,13 @@
             <li class="home"><a href="/">{{ site.title }}</a></li>
             <!--Table of Pages-->
             <ul class="pages">
-                {% for _page in site.pages %}
+                {%- for _page in site.pages -%}
                 {% comment %}Skip page with empty title{% endcomment %}
-                {% unless _page.title %}{% continue %}{% endunless %}
+                {%- unless _page.title -%}{% continue %}{%- endunless -%}
                 {% comment %}Skip home page{% endcomment %}
-                {% if _page.url == "/" %}{% continue %}{% endif %}
+                {%- if _page.url == "/" -%}{% continue %}{%- endif -%}
                 <li><a href="{{ _page.url }}">{{ _page.title }}</a></li>
-                {% endfor %}
+                {%- endfor -%}
             </ul>
             <!--Table of Posts-->
             <ul class="posts">
页内导航
git clone git@github.com:allejo/jekyll-toc.git
复制 _includes/toc.html 到 _includes 中
在想要增加页内导航的地方放上 {% include toc.html html=content %} 就可以了
html {
    scroll-behavior: smooth;
}
增加平滑滚动
Colored diff
.gd {
    background-color: rgb(255, 236, 236);
}
.gi {
    background-color: rgb(234, 255, 234);
}
为 diff 增加高亮
图片放大
npm install jquery-viewer jquery viewerjs
*/dist->assets/js|css
将 jquery.js & viewer.js & jquery-viewer.js & viewer.css 复制到指定文件夹
<link  href="/assets/css/viewer.css" rel="stylesheet">
<script src="/assets/js/jquery.js"></script>
<script src="/assets/js/viewer.js"></script>
<script src="/assets/js/jquery-viewer.js"></script>
添加引用
<script>
    let Viewer;
    $(document).ready(function(){
        Viewer = $("#page-content").viewer();
    })
</script>
初始化, 扫描 <div> 内所有的 <img> 标签
img {
    cursor: zoom-in;
}
设置鼠标光标
点击即可放大图片
Jekyll Plugins
Jekyll Spaceship
--- a/Gemfile
+++ b/Gemfile
@@ -1,6 +1,7 @@
 source "https://rubygems.org"
 gem "jekyll", "~> 4.2.2"
 group :jekyll_plugins do
+  gem 'jekyll-spaceship'
 end
bundle install
---
Bundle complete! 7 Gemfile dependencies, 38 gems now installed.
--- a/_config.yml
+++ b/_config.yml
@@ -12,3 +12,6 @@ defaults:
       path: ""
     values:
       layout: "post"
+
+plugins:
+  - jekyll-spaceship
jekyll serve
---
  Jekyll Spaceship: 🚀 Jekyll-Spaceship 0.10.2
  Jekyll Spaceship: 🎉 A Jekyll plugin to provide powerful supports.
  Jekyll Spaceship: 👉 https://github.com/jeffreytse/jekyll-spaceship
  Jekyll Spaceship: 🗂  use table-processor
  Jekyll Spaceship: 🗂  use mathjax-processor
  Jekyll Spaceship: 🗂  use plantuml-processor
  Jekyll Spaceship: 🗂  use mermaid-processor
  Jekyll Spaceship: 🗂  use polyfill-processor
  Jekyll Spaceship: 🗂  use media-processor
  Jekyll Spaceship: 🗂  use emoji-processor
  Jekyll Spaceship: 🗂  use element-processor
配置完成
搜索引擎相关
SEO Tags
SEO(Search Engine Optimization) 顾名思义就是优化搜索引擎的索引效果, 提高网站访问量
--- a/_includes/head.html
+++ b/_includes/head.html
@@ -2,6 +2,8 @@
     <meta charset="utf-8">
     <meta name="viewport" content="width=device-width, initial-scale=1">

+    {% seo %}
+
     <!--CSS Style Sheets-->
     <link rel="stylesheet" href="/assets/css/styles.css" />
     <link rel="stylesheet" href="/assets/css/github-markdown.css" />
可以看到已经增加了 SEO-Tags 了
Sitemap
Sitemap, 通知搜索引擎有哪些网页可供抓取
观察到 _site 下生成了 robots.txt 和 sitemap.xml
最后修改时间
提供网页最后一次修改的时间, 搜索引擎根据这一信息确定是否需要更新索引
--- a/_includes/page.html
+++ b/_includes/page.html
@@ -14,6 +14,11 @@
                 {{ page.date | date: "%Y-%m-%d" }}
             </li>
             {% endif %}
+            {% assign lastMod = page.last_modified_at | date: "%Y-%m-%d" %}
+            {% assign publish = page.date | date: "%Y-%m-%d" %}
+            {% if publish != lastMod %}
+            <li id="last-modified">
+                {{ lastMod }}
+            </li>
             <!--Categories-->
增加最后修改时间显示
--- a/_sass/page.scss
+++ b/_sass/page.scss
@@ -21,6 +21,11 @@
                 border: none;
             }

+            .last-modified::before {
+                content: '\f044';
+                font-family: "FontAwesome";
+            }
+
             .categories {
                 display: inline-block;
             }
图标的 Unicode 可在 FontAwesome 的网站查到

最后修改时间有误?
本地查看正常, 但在 Github Action 上的却是部署时的日期
这是因为 checkout action 仅仅进行了 shallow clone
--- a/.github/workflows/build-jekyll.yml
+++ b/.github/workflows/build-jekyll.yml
@@ -10,6 +10,8 @@ jobs:
     runs-on: ubuntu-latest
     steps:
       - uses: actions/checkout@v3
+        with:
+          fetch-depth: '0'

       # Use GitHub Actions' cache to cache dependencies on servers
       - uses: actions/cache@v2
修改为 deep clone
本地查看正常, 但在 Github Action 上的日期却提前一天
--- a/_config.yml
+++ b/_config.yml
@@ -22,4 +22,6 @@ plugins:
+
+timezone: Asia/Shanghai
设置时区
分类目录
自动生成分类目录
archive.html
<!DOCTYPE html>
<html>

{% include head.html %}

<body>
    {% include nav-aside.html %}
    <div id="nav-main">
        <!--Nav-Top-->
        <div id="nav-top">
            <a href="#top">{{ page.title }}</a>
        </div>
        <div id="archive">
            <div id="posts" class="markdown-body">
                <h1>{{ page.title }}</h1>
                <ul>
                    {% for post in page.posts %}
                    <li class="post">
                        <span class="date">{{ post.date | date: "%Y-%m-%d" }}</span>
                        <a class="link" href="{{ post.url | relative_url }}">{{ post.title }}</a>
                    </li>
                    {% endfor %}
                </ul>
            </div>
        </div>
    </div>
</body>

</html>
archive.scss
#archive {
    display: flex;
    justify-content: center;

    #posts {
        width: 800px;
        // Extra space for showing the last item
        padding-bottom: 50px;
    }
}

Github Action
Repo Settings
Repo->Settings->Pages->Build and Deployment
Source = Deploy from a branch
Branch = gh-pages
|
/root |
可以在下面的 Action 运行一次之后再配置, 让它来生成 gh-pages 分支
Action
参照文档添加 build-jekyll.yml
name: Build and Deploy to Github Pages

on:
  push:
    branches:
      - main

jobs:
  build_and_deploy:
    runs-on: ubuntu-latest
    steps:
      - uses: actions/checkout@v3

      # Use GitHub Actions' cache to cache dependencies on servers
      - uses: actions/cache@v2
        with:
          path: vendor/bundle
          key: ${{ runner.os }}-gems-${{ hashFiles('**/Gemfile.lock') }}
          restore-keys: |
            ${{ runner.os }}-gems-

      # Use GitHub Deploy Action to build and deploy to Github
      - uses: jeffreytse/jekyll-deploy-action@v0.4.0
        with:
          provider: "github"
          token: ${{ secrets.GITHUB_TOKEN }}
配置完成
Automatic token authentication
GITHUB_TOKEN 是在 Workflow 运行时自动分配的, 不需要配置